This dairy-free creme brulee uses full-fat coconut milk to create a creamy texture without dairy. Controlling the heat is essential for the perfect custard.
Key takeaways
- Using full-fat coconut milk is crucial for achieving the right texture.
- Egg yolks must be tempered to prevent curdling during cooking.
- Even distribution of sugar is key for a perfect caramelized crust.
- Baking at the correct temperature ensures a smooth custard without curdling.

Coconut Crème Brûlée: Dairy-Free Delight
Ingredients
- 1 can (13.5 oz) full-fat unsweetened coconut milk, divided
- ⅓ cup (67g) granulated sugar
- 1 ½ tsp vanilla bean paste or extract
- 5 large egg yolks
- Granulated sugar for topping
- pinch salt
Instructions
- Preheat oven to 300°F (150°C) and place four 6 oz. ramekins in a medium baking dish.
- In a medium saucepan, bring 1 cup of coconut milk and ⅓ cup of granulated sugar to a boil, stirring to dissolve. Remove from heat, stir in vanilla, cover, and let sit for 10 minutes.
- Meanwhile, bring a kettle of water to a boil. Stir the remaining coconut milk into the hot milk/sugar mixture.
- Whisk egg yolks in a medium bowl, then slowly stream the warm coconut milk mixture into the yolks, whisking constantly until combined.
- Divide the mixture evenly into ramekins. Carefully fill the baking pan with hot water, ⅔ up the sides of the ramekins, creating a water bath.
- Bake for 30-35 minutes, or until the internal temperature reaches 175°F (79°C) and the center is barely set.
- Cool ramekins in the water bath at room temperature for 2 hours, then transfer to the refrigerator and chill for at least 4 hours.
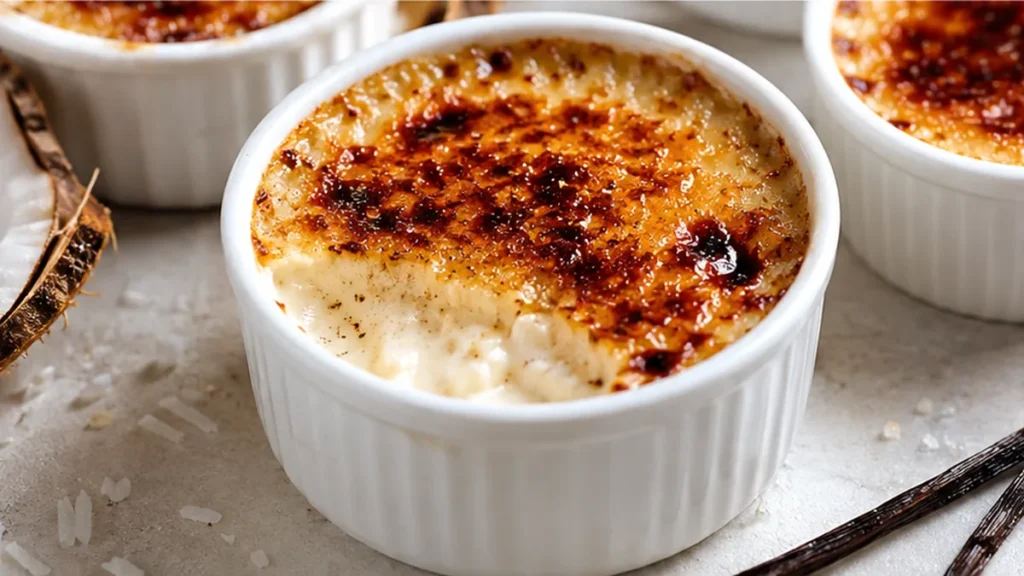
- Just before serving, sprinkle with granulated sugar and caramelize with a kitchen torch.
Video
Notes
The Role of Coconut Milk in Dairy-Free Crème Brûlée
Coconut milk serves as the primary base for this dairy-free crème brûlée, providing a rich and creamy texture that mimics traditional dairy. The full-fat variety is essential, as it contains around 24 grams of fat per cup, which contributes to the overall mouthfeel and richness of the dish. The emulsion of fat and liquid in coconut milk is crucial; if the mixture is not well combined, it can lead to a separation during baking.
Understanding the Importance of Egg Yolks
Egg yolks are vital for creating the custard-like texture in this dessert. Each yolk contains about 3 grams of fat and proteins that coagulate at specific temperatures, typically around 170°F (77°C). This coagulation process thickens the mixture and sets the crème brûlée. Overheating can cause the yolks to curdle, resulting in a grainy texture instead of the desired smoothness.
Common Pitfalls and How to Avoid Them
- Curdling the Custard: If the mixture is heated too quickly or to too high a temperature, the egg yolks can curdle. To prevent this, heat the coconut milk gently and temper the yolks by gradually adding a small amount of the hot milk to them before combining all.
- Insufficient Baking Time: Underbaking will result in a runny custard. Ensure the mixture is set around the edges but slightly jiggly in the center, which typically takes 30-40 minutes at 325°F (160°C).
- Uneven Sugar Topping: For a perfect caramelized crust, ensure the sugar is evenly distributed over the surface. Use a fine layer of sugar, about 1-2 teaspoons per ramekin, to allow for even melting and browning.
- Excessive Cooling Time: While it’s essential to let the crème brûlée cool before serving, allowing it to sit too long can lead to a less creamy texture. Aim for a chilling time of about 2-4 hours for optimal results.
Ingredient Substitutions and Their Effects
- Maple Syrup for Sugar: Using maple syrup instead of granulated sugar will impart a distinct flavor but may alter the texture slightly, making it a bit softer.
- Chia Seeds as a Thickener: For a plant-based alternative, chia seeds can be blended into the mixture, but this will change the texture and create a slightly grainy finish.
- Agave Nectar for Sweetness: This can be used as a substitute for sugar, offering a different sweetness profile; however, it may require adjustments in the overall liquid content of the recipe.
- Vanilla Extract instead of Vanilla Bean Paste: While vanilla extract is a common substitute, it lacks the visual appeal and concentrated flavor of vanilla bean paste, which contains the seeds for added texture.
The Unique Aspect of This Dairy-Free Dessert
Unlike traditional crème brûlée, which relies on dairy for its creamy texture, this dairy-free version uses coconut milk, offering a unique tropical flavor profile. The natural sweetness of coconut milk pairs beautifully with the caramelized sugar topping, creating a delightful contrast that sets it apart from its dairy counterpart.
How to Prepare Coconut Crème Brûlée in Advance
Making coconut crème brûlée ahead of time is a great way to ensure a stress-free dessert experience. After baking the custard, allow it to cool to room temperature, then cover it with plastic wrap and refrigerate for up to 2 days. This chilling period enhances the flavors and allows the custard to set properly. Just before serving, sprinkle granulated sugar on top and caramelize it with a kitchen torch or broiler. Be cautious with the broiler; keep the custard a safe distance to avoid overheating.
Adjusting Serving Sizes Without Compromising Quality
Scaling the recipe is straightforward, but precision is key. For every additional serving, maintain the same ratio of ingredients: for instance, if doubling the recipe, use 2 cans of coconut milk, ⅔ cup sugar, and 10 egg yolks. The baking time may vary—check for doneness by gently shaking the ramekins; the custard should be slightly jiggly but not liquid. Adjusting the baking time is crucial since larger batches might require additional time in the oven.
Choosing the Right Equipment for Optimal Results
The choice of ramekins can significantly affect the outcome of your coconut crème brûlée. Opt for shallow, wide ramekins, which allow for even cooking and easier caramelization of the sugar topping. If using a broiler, ensure the ramekins are broiler-safe. For best results, use a kitchen torch for caramelizing, as it provides more control over the heat and prevents the custard from overheating. Avoid glass ramekins if possible, as they can crack under high heat.
Considering Seasonal Ingredients for Enhanced Flavor
Seasonal ingredients can elevate your dairy-free crème brûlée. In summer, consider infusing the coconut milk with fresh herbs like mint or basil for a refreshing twist. In fall, try incorporating spices such as cinnamon or nutmeg to complement the coconut flavor. The quality of your vanilla bean paste or extract also matters; using freshly sourced vanilla can enhance the dessert’s aromatic profile. Always taste your ingredients to ensure they are at their peak quality, as this directly influences the final dish.
Why the texture can become grainy and how to achieve a silky smooth finish
The key to a creamy texture in coconut crème brûlée lies in the proper emulsification of the coconut milk and egg yolks. When combining these ingredients, whisk them gently but thoroughly to avoid incorporating too much air, which can lead to a grainy texture. Heat control is crucial; bake the custard at a low temperature of 325°F (160°C) to ensure even cooking without curdling the eggs. Using a water bath (bain-marie) helps regulate the temperature, preventing the edges from cooking faster than the center. Aim for a final custard temperature of around 170°F (77°C) for optimal results.
How to scale the recipe without compromising flavor and texture
Scaling the recipe requires careful adjustments to maintain the balance of flavors and textures. If doubling the recipe, use two cans of coconut milk and increase the sugar to 2/3 cup (134g). Maintain the same number of egg yolks to ensure the custard sets properly; using too many yolks can lead to an overly rich texture. Keep the baking time similar, but check for doneness by gently shaking the ramekins; the center should still have a slight jiggle. For larger batches, consider using a larger baking dish and adjusting the water bath accordingly.
Understanding the impact of serving temperature and presentation
Serving temperature is essential for the best experience of coconut crème brûlée. Allow the custard to chill in the refrigerator for at least 4 hours or overnight for optimal flavor development. Just before serving, sprinkle an even layer of granulated sugar on top and use a kitchen torch to caramelize it until it forms a crispy crust. The contrast between the cold, creamy custard and the warm, crunchy topping is a hallmark of this dessert. Pair with fresh fruit, such as berries or mango, to enhance the tropical flavor and add freshness to each bite.
How to Ensure Your Coconut Crème Brûlée Sets Perfectly
The key to achieving the perfect set in your dairy-free crème brûlée lies in the precise control of temperature during baking. The custard should be baked in a water bath at a temperature of 325°F (163°C) for about 30-40 minutes. Using a thermometer to monitor the internal temperature is crucial; it should reach around 170°F (77°C) for optimal thickening without curdling. If the custard is undercooked, it will remain too runny, while overcooking can lead to a grainy texture.
To prevent the top from browning too quickly, consider covering the ramekins loosely with aluminum foil during the first half of the baking process. This technique allows for gentle cooking and helps maintain the creamy texture. After baking, allow the custards to cool at room temperature before refrigerating for at least 4 hours or overnight. This resting period is essential for proper setting.
Understanding the Importance of Cooling and Caramelizing
Cooling your coconut crème brûlée before caramelizing the sugar topping is critical for achieving that signature crispy layer. After chilling, the custard should be very cold, ideally below 40°F (4°C). This temperature difference helps the sugar caramelize properly without melting into the custard. When you sprinkle granulated sugar on top, use a thin, even layer to ensure uniform melting.
For the best results, use a kitchen torch to caramelize the sugar; this allows for precise control over the browning process. If you don’t have a torch, you can also place the ramekins under a broiler for a few minutes, but watch closely to avoid burning. The ideal caramelization should yield a hard, glass-like surface that cracks beautifully when tapped with a spoon. Allow the brûlée to sit for a minute after caramelizing to let the sugar harden before serving, ensuring a delightful contrast between the creamy custard and the crispy sugar topping.
Pro tips
- For the classic speckled look and a stronger aroma, use vanilla bean paste instead of extract.
- To prevent curdling, slowly stream the warm coconut milk mixture into the whisked egg yolks while continuously whisking.
- Proper chilling is key: allow the brûlées to cool completely in the water bath, then chill for at least 4 hours in the refrigerator for the best set texture.
- Ensure the internal temperature reaches 175°F (79°C) for food safety and proper setting. The center should still have a slight jiggle.
This dairy-free crème brûlée proves that indulgence doesn’t need dairy. Enjoy this elegant dessert and impress your guests with its rich flavor and satisfying crackle. Bon appétit!
Frequently asked questions
Can I use light coconut milk instead of full-fat?
Using light coconut milk will result in a less creamy texture and may lead to a thinner custard. Full-fat coconut milk is recommended for the best results.
How do I know when the crème brûlée is done baking?
The crème brûlée is done when the edges are set, but the center remains slightly jiggly. This usually takes about 30-40 minutes at 325°F (160°C).
What can I use if I don’t have vanilla bean paste?
You can substitute vanilla extract for vanilla bean paste. However, it won’t provide the same visual appeal or concentrated flavor as paste does.
How long can I store the crème brûlée?
The crème brûlée can be stored in the refrigerator for up to 3 days. However, avoid adding the sugar topping until just before serving to ensure a crisp crust.
More from Gluten-Free Desserts & Sweets →