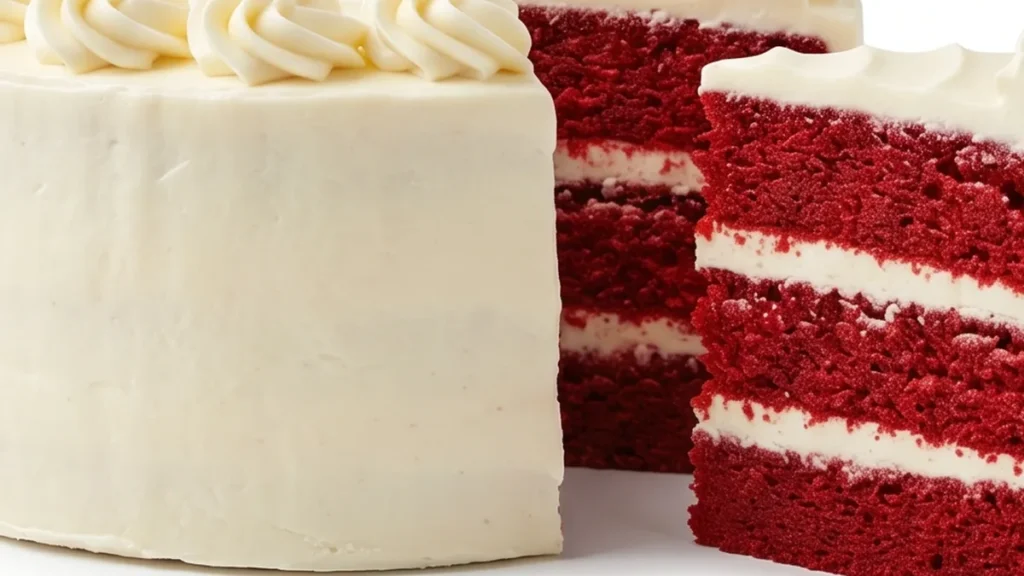
This Gluten-Free Red Velvet Cake recipe is a showstopper that’s surprisingly easy to make. Forget dry, crumbly gluten-free cakes; this version delivers an intensely moist and tender crumb with that classic, bright red hue and subtle chocolate flavor. Perfect for birthdays, holidays, or any occasion where a special dessert is needed. Whether you’re new to gluten-free baking or a seasoned pro, this red velvet cake recipe is designed for success. It uses simple ingredients and straightforward steps to achieve a bakery-quality result that everyone will love, regardless of dietary needs.
Key takeaways
- The reaction between milk and vinegar creates a buttermilk substitute, essential for activating baking soda and achieving a tender crumb.
- Accurate flour measurement and avoiding overbaking are key to preventing a dry cake.
- Use gel or paste red food coloring for the most bright color.
- Ensure baking soda is fresh and properly activated for adequate leavening.
Ultimate Red Velvet Cake: Pure Bliss!
Ingredients
- 1 cup milk (Dairy-free use unsweetened almond or coconut milk.)
- 1 tablespoon white vinegar
- 2 1/2 cups all-purpose gluten-free flour with xanthan gum
- 1 teaspoon baking soda
- 1 teaspoon salt
- 2 teaspoons cocoa powder
- 1/2 cup unsalted butter, softened (Dairy-free use Smart Balance butter.)
- 2 cups granulated sugar
- 2 large eggs
- 1 teaspoon pure vanilla extract
Instructions
- Preheat oven to 350°F (175°C). Grease and flour two 8-inch round cake pans.
- In a small bowl, whisk together milk and white vinegar. Let sit for 5 minutes to curdle.
- In a large bowl, whisk together gluten-free flour, baking soda, salt, and cocoa powder.
- In a separate large bowl, cream together softened butter and granulated sugar until light and fluffy.
- Beat in eggs one at a time, then stir in vanilla extract and the milk mixture.
- Gradually add the dry ingredients to the wet ingredients, mixing until just combined. Do not overmix. Pour batter evenly into prepared pans.
- Bake for 30-35 minutes, or until a wooden skewer inserted into the center comes out clean.
- Let cakes cool in pans for 10 minutes before inverting onto a wire rack to cool completely.
Notes
The technique that makes it
The signature moist crumb and bright red hue of this red velvet cake are achieved through a careful balance of ingredients and a specific chemical reaction. The buttermilk substitute, created by combining milk with white vinegar, acts as an acid. When this acid interacts with the baking soda, a leavening agent, it produces carbon dioxide gas. This gas gets trapped within the gluten-free flour’s structure, causing the cake to rise and develop a tender, airy texture. The cocoa powder, while contributing a subtle chocolate flavor, also reacts with baking soda, further enhancing leavening. Crucially, the red food coloring is what provides the iconic color. For the best color saturation and to prevent a metallic aftertaste from excessive food coloring, it’s important to use a good quality gel or paste food coloring rather than liquid. The butter and sugar are creamed together thoroughly to incorporate air, which aids in the cake’s lift and contributes to a fine crumb. Ensure the butter is softened but not melted, allowing it to emulsify effectively with the sugar.
Troubleshooting
- Cake is dry and crumbly: This often happens if the cake is overbaked or if the liquid-to-flour ratio is off. Ensure you measure your gluten-free flour accurately by spooning it into the cup and leveling, rather than scooping directly from the bag. Bake only until a toothpick inserted into the center comes out with moist crumbs attached, not clean.
- Cake did not rise properly: Check the freshness of your baking soda; it loses potency over time. Also, ensure the vinegar and milk mixture has had at least 5 minutes to curdle, activating the acid. Overmixing the batter after adding the flour can also deflate the leavening agents.
- Color is dull or not bright enough: The quality and type of red food coloring make a significant difference. Gel or paste food coloring provides a more concentrated pigment than liquid. Ensure you’re using the amount specified, and consider that some gluten-free flour blends can absorb more color.
- Cake has a metallic or bitter taste: This can sometimes occur if too much baking soda or cocoa powder is used, or if a lower-quality red food coloring is employed. Ensure precise measurements and use a reputable brand of cocoa and food coloring.
Substitutions
- Dairy-free milk: Unsweetened almond milk or coconut milk can be used in place of regular milk. The result will be a similar texture, though a very subtle flavor note from the nut or coconut might be detectable.
- Dairy-free butter: A plant-based butter substitute like Smart Balance can be used for the unsweetened butter. This will yield a comparable texture and richness to the cake.
- Gluten-free flour blend: If you don’t have a blend with xanthan gum, you can add 1/2 teaspoon of xanthan gum to 2 1/2 cups of a standard gluten-free flour mix. This is crucial for binding and structure in gluten-free baking.
- Vinegar: While white vinegar is ideal for its neutral flavor, apple cider vinegar can be substituted in a pinch. The slight fruitiness of apple cider vinegar is usually not noticeable in the final cake.
Pro tips
- Ensure your butter is truly softened for optimal creaming.
- Don’t overmix the batter once the dry ingredients are added.
- Use a good quality cocoa powder for deeper chocolate flavor.
- Let the cakes cool completely before frosting to prevent melting.
Enjoy this stunning and delicious gluten-free red velvet cake. Share your creations and happy baking!
More from Gluten-Free Desserts & Sweets →
Frequently asked questions
Can I make red velvet cake ahead of time?
Yes, you can bake the cake layers a day in advance. Once completely cooled, wrap them tightly in plastic wrap and store them at room temperature. For the frosting, it’s best to make it closer to serving time for optimal texture, but it can be refrigerated for a day and brought back to room temperature.
What is the best way to store leftover red velvet cake?
Store unfrosted cake layers in an airtight container at room temperature for up to 2 days. Once frosted, keep the cake in an airtight container in the refrigerator for up to 4 days. Allow it to come to room temperature for about 30 minutes before serving for the best flavor and texture.
How do I know when red velvet cake is done baking?
A red velvet cake is done when a wooden skewer or toothpick inserted into the center comes out clean, with no wet batter attached. The cake should also spring back lightly when touched in the center. Avoid overbaking, which can result in a dry cake.
What can I substitute for buttermilk in red velvet cake?
If you don’t have buttermilk, you can easily make a substitute. For each cup of buttermilk needed, mix 1 cup of milk with 1 tablespoon of white vinegar or lemon juice. Let it stand for 5-10 minutes until it slightly curdles. This will provide the necessary acidity for the cake’s texture and flavor.